
Step-by-step guide to resisted fire hydrants
Maximize effectiveness: Tips for patients and practitioners
Step-by-step guide to resisted fire hydrants
Maximize effectiveness: Tips for patients and practitioners

1. Step-by-step how to do resisted fire hydrants

2. How to perform resisted fire hydrants. Follow these instructions.
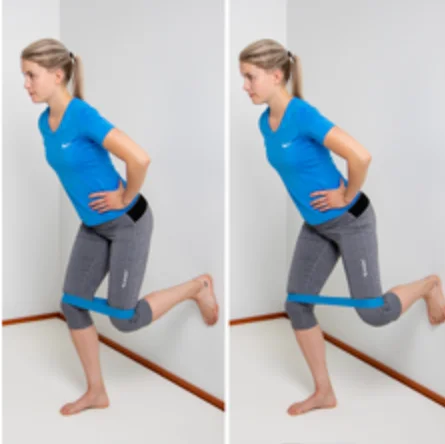
Step 1
Start by standing with an exercise band loop around your knees (slightly under) with your back towards a wall. Bend one knee to 90 degrees and place the sole of the foot against the wall behind you. Slightly bend over from your trunk.
Step 2
Press the foot against the wall, and against the resistance from the band, bring the bent knee outwards and feel your buttock muscles working. Keep the supporting leg in place and knee aligned with hip and toes. Return to the starting position.
Step 3
Step 4
Step 5

%20(1).avif)
3. About resisted fire hydrants
- Hip abduction exercise using resistance bands - Mimics the movement of a dog lifting its leg - Targets outer hip muscles
4. Benefits of resisted fire hydrants
Here are some potential benefits of performing this exercise:
- Strengthens hip muscles - Enhances hip stability - Improves lateral movement
5. FAQ on resisted fire hydrants
How do I perform Resisted Fire Hydrants?
Use resistance bands while lifting leg sideways.
What muscles does it target?
Targets hip abductors, specifically the outer hip muscles.
How many reps and sets should I do?
Start with 3 sets of 12-15 reps on each leg. Adjust as needed for your fitness level.
Can I do this exercise without resistance bands?
Yes, but using bands adds intensity and challenges the muscles more.

